Somehow, somewhere, many years ago, someone decided that instead of using proper, proprietary off-the-shelf parts, it was acceptable to mix disparate plumbing components to make a seacock assembly. It's a clear-cut case of old, bad habits dying hard. In some cases, this type of creative field engineering actually results in an improved design. Sadly, in this example, where seacocks are concerned, it doesn't; the result is dangerous, unreliable and lacks compliance with American Boat and Yacht Council standards (and as a result many insurers as well).
The arrangement to which I'm referring is the through-hull fitting–the threaded, mushroom-shaped part whose head can be seen on the outside of the boat–and an in-line ball valve, the part that's accessible from within the vessel. Perhaps the greatest danger in this faulty arrangement is its sheer ubiquity so many boats have been and continue to be built and serviced using this arrangement that it's become commonplace, leading many to believe it's correct simply by sheer repetition and volume.
Right Before Wrong: Proper Seacock Selection and Installation Tips Before delving into a critique of this faulty seacock, it's important to understand how a proper seacock installation is arranged and installed. Seacocks are (or should be) designed to afford the user a quick, easy method of stemming the flow of water into the vessel in the event of a failed hose or plumbing component. If, for instance, the hose between the seacock and the engine or generator raw water strainer or pump fails, closing the respective seacock stops the water flow until a repair can be carried out. Seacocks are also used for routine maintenance of plumbing components located below the waterline, including sea strainers and pumps.
A typical, correct seacock installation includes the seacock body itself. This is a valve with a design that includes a load-distributing flange and typically two female threaded holes. Seacocks should be built to meet the Underwriter Laboratory (UL) 1121 approval for Marine Through-Hull Fittings and Sea-Valves. It's important to note the UL distinction of "Sea-Valves" rather than simply "Valves". Many types of valves carry a UL approval; however, the approval covers the valve's ability to convey various liquids, not its ability to work as a seacock or sea-valve.
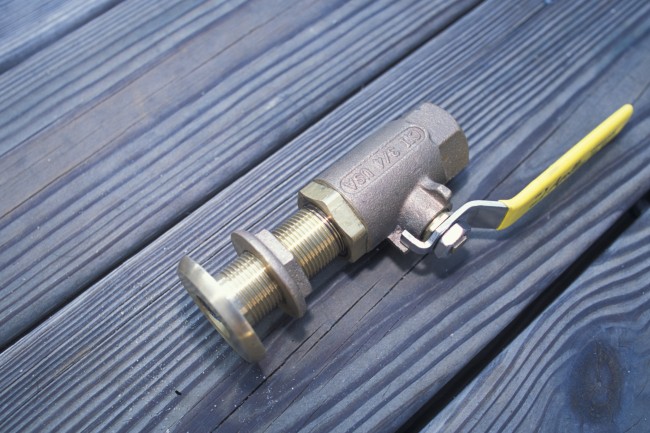
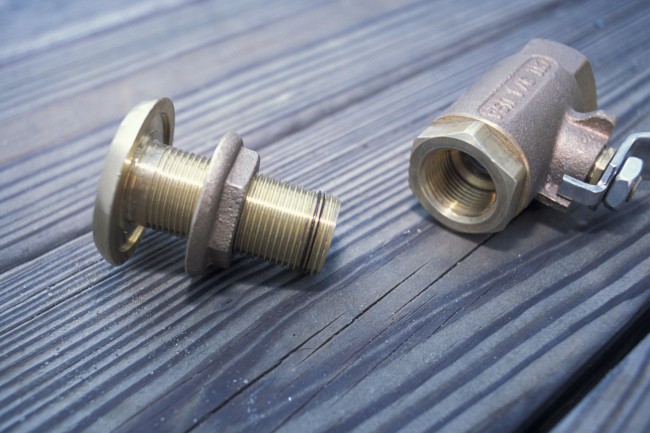
ABOVE: A through-hull fitting and inline ball valve (left), a common, but incorrect arrangement. When
disassembled the meager thread engagement, identified by the black line, is all too clear (right).
The hole in the seacock that faces down (or towards the hull) utilizes parallel or National Pipe Straight (NPS) threads, while the hole on the top of the valve–the one that faces into the vessel–typically uses tapered pipe or National Pipe Tapered (NPT) threads. A through-hull fitting (the aforementioned mushroom-shaped device) uses straight threads that mate with like threads in the seacock.
Most seacock installations include a backing block that's designed to further distribute the load of the seacock's flange. Ideally, backing blocks are made of .5- or .75-inch fiberglass sheet, a product known as GPO 3, and they are a minimum of 1 inch larger in diameter than the base of the seacock's flange. The backing block should be round to minimize stress risers and the potential for cracking.
An alternative, a product that was used for many years before the advent of GPO, calls for the use of epoxy-encapsulated marine plywood. Marine plywood is rot resistant and, equally as important, is void-free, making it strong and compression resistant. As durable as it is, if it's exposed to bilge water, especially fresh water, along with fuel, oil or bilge-cleaning chemicals, marine plywood may fail, and thus it is best to encapsulate it in several coats of two-part epoxy. Once treated in this manner, marine plywood backing blocks are reliable and long-lasting.
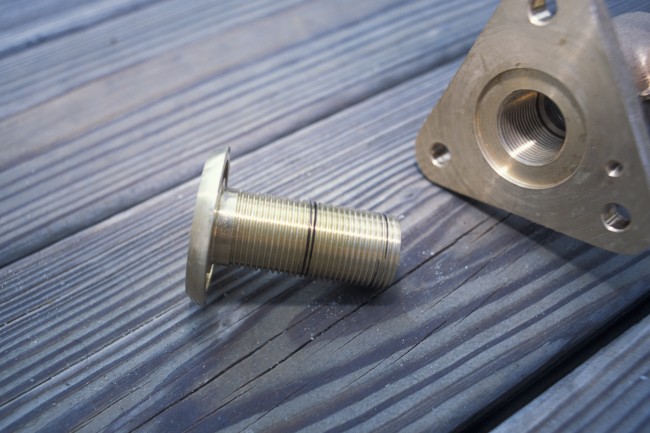
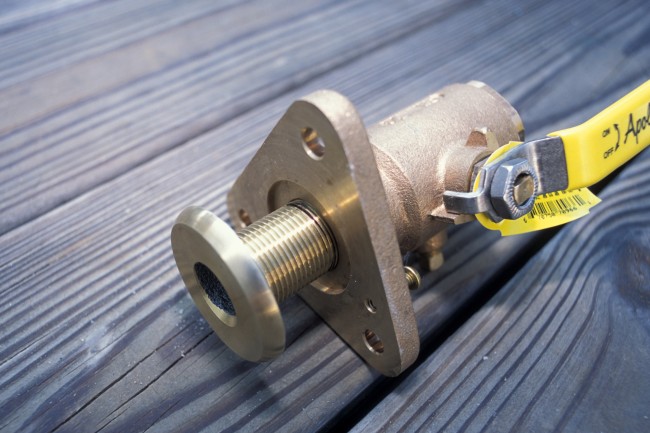
ABOVE: Through-hull fittings are designed to engage matching threads, like those found on seacocks (left). When mated, these two components can have upwards of ten threads of engagement, the black line once again indicates this, making for an immensely strong assembly (right)
Common backing block materials that should be avoided include solid timber, and even teak and mahogany. As desirable as solid exotic hardwoods may be for interior joiner work, decks and cap rails, they are not appropriate for backing blocks and other high-compression loads due to their propensity to split along grain boundaries. Equally as undesirable are non-reinforced plastics, such as ultra-high molecular weight plastic (UHMW), known by its trade name Starboard®. While this material has many attributes because of its flexibility and slipperiness, it can be problematic when used as a seacock-backing block. Additionally, in many cases backing blocks must be set in thickened epoxy during installation to account for hull irregularity or curvature. Because of its slick surface, epoxy will not bond well to Starboard and other similar materials, making this process difficult, if not impossible, to accomplish.
The area over which the seacock and backing block are to be installed inside the hull should be free of gelcoat. If the interior of the hull is gelcoated, it must be ground off in a footprint that matches the size and shape of the backing block. This ensures that the epoxy in which the the backing block is set bonds with the fiberglass rather than the gelcoat.
Sealant used in the installation process must, of course, be designed for applications below the waterline. This is typically polyurethane-based sealant and includes 3M 5200, Sikaflex 291 and others. During the installation the sealant must be applied to surfaces that have been thoroughly cleaned of all grease, oil, wax and paint. This means all seacock, through-hull parts and hull surfaces should be washed in solvent first, such as denatured alcohol or mineral spirits. Most metal components are heavily contaminated with cutting oil or wax, and it's important that be removed from sealing surfaces.
Additionally, bottom paint must be removed from the sealing area beneath the through-hull fitting's head. Caution must be used when applying sealant to through-hull threads: The application should begin approximately 1 inch below the end of the through-hull fitting to prevent sealant from being ingested into the inside of the through-hull and seacock body, where it can interfere with water flow.
While this is not a full description of a seacock installation, it covers important aspects and areas in which errors frequently occur. Using the above-described method the installation of a new seacock where none existed before typically takes 6 to 8 hours. Sound like a lot? If it takes less time, it's probably not being installed correctly.
Wrong Revisited Back to the all-too-common incorrect seacock installation. Regrettably, what frequently passes for a seacock is, in fact, the aforementioned through-hull fitting mated to an in-line ball valve. There are essentially two problems with this approach. One, it's unlikely such a flange-free installation could pass the ABYC-recommended 500-pound static load test, in which 500 pounds is applied to the inboard end of the installation for 30 seconds, during which a failure must not occur. A second problem–and this is an especially insidious flaw–the threads of a NPS through-hull and an NPT in-line ball valve are by their very definition incompatible. When mated, "engagement" is typically only two to three revolutions before seizure occurs. While it seems as though this should be obvious for any mechanical installation, ABYC Standards call for (among other things where seacock installations are concerned) the use of compatible threads. There's no getting around these guidelines, not to mention plain old common sense. After all under what other circumstances would you condone interconnection of incompatible threads anywhere aboard your vessel? When considering a new boat, or when a seacock is to be installed aboard a boat you own, make sure it will meet this all-important standard.
Steve D'Antonio is a marine systems consultant offering services to boat buyers, owners and the marine industry, as well as an author and photographer. He is an ABYC-Certified Master Technician. Read more from Steve at www.stevedmarineconsulting.com.


